Development of Life Prediction Model for Ceramic Matrix Composites (CMC) with Cooling Holes
SATO Hayao, HARUYAMA Daichi, KITAMURA Yoshiyuki, NAKAMURA Hiroshi, HONDA Tatsuhito

SATO Hayao : Engine Technology Department, Research & Engineering Division, Aero Engine, Space & Defense Business Area
HARUYAMA Daichi : Computational & Mathematical Engineering Department, Technology Platform Center, Corporate Research & Development Division
KITAMURA Yoshiyuki : Manager, Engine Technology Department, Research & Engineering Division, Aero Engine, Space & Defense Business Area
NAKAMURA Hiroshi : Doctor of Engineering, Manager, Technology Management Department, Research & Engineering Division, Aero Engine, Space & Defense Business Area
HONDA Tatsuhito : Manager, Engine Technology Department, Research & Engineering Division, Aero Engine, Space & Defense Business Area
Ceramic matrix composites (CMC) have higher heat resistance and specific modulus than Ni-based alloys, thus they are desired to be more applied to aircraft engine parts such as turbine parts. As engine parts are exposed in the condition over the heat durability, multiple holes are generally made on them in order to cool their surface. However, there are few research results on small hole effect for CMC fatigue life. This study focused on this phenomenon. Fatigue tests were conducted using flat plates manufactured with a single hole and multiple holes. As a result of tests, different fracture and crack propagation modes were observed between single-holed and multiple-holed types. A life prediction model was considered to explain the life degradation. The strength parameters were calculated by averaging stress fields, which were predicted by finite element analysis (FEA), in area of CMC unit cell. By using the life prediction model developed in this study, fatigue lives of all types of test pieces with hole can be predicted based on the S-N curve obtained from a smooth-shaped test piece without hole.
1. Introduction
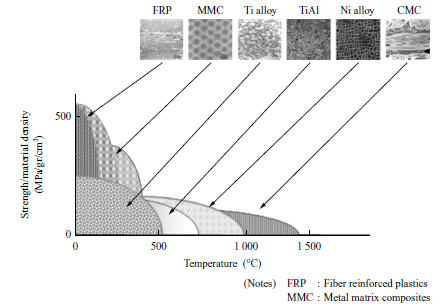
The International Air Transport Association (IATA) has set a goal of achieving net-zero carbon emissions from civilian aircraft by 2050(1). To that end, there has been an effort to improve engine performance by increasing turbine inlet temperature (TIT), for which materials with higher heat resistance are required. Figure 1 shows material performance with respect to heat durability and specific strength. Ceramic matrix composites (CMC) have higher heat resistance than Ni-based alloys and are expected to be applied to aircraft engines including turbines or other parts, for performance improvement and weight reduction.
The Japan Aerospace Exploration Agency (JAXA) initiated the Environmentally Compatible Core Engine Technology Research (En-Core) project in 2018 to demonstrate the core engine technology(2). In the project, JAXA and IHI have collaboratively proposed a concept for a next-generation engine turbine and have undertaken the development of design technologies along with their verification. The proposed concept for the next-generation turbine vane is illustrated in Fig. 2. There have been many studies on cooling systems for prospective application of CMC to high-temperature parts(3). In contrast, there have been very few cases of study on the relationship between small holes in composite materials for cooling purposes and their mechanical characteristics. In this study, focusing on the relationship between the specifications of cooling holes (sizes, shapes, and pitches) and fatigue life, a fatigue test was conducted using flat plate test pieces prepared by providing simple flat plates with small holes.
2. Tests
2.1 Material
The test pieces were cut from CMC plates made of continuous SiC (silicon carbide) fiber fabric, featuring a three-dimensional weave structure. The CMC plates were formed by bundling fibers into fiber bundles at a submillimeter scale using the chemical vapor infiltration (CVI) method, followed by solidification of the fiber bundles with rare earth materials through the melt infiltration (MI) method. Mechanically processed CMC plates were used as the test pieces.
2.2 Shapes of test pieces
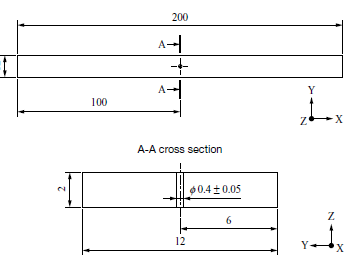
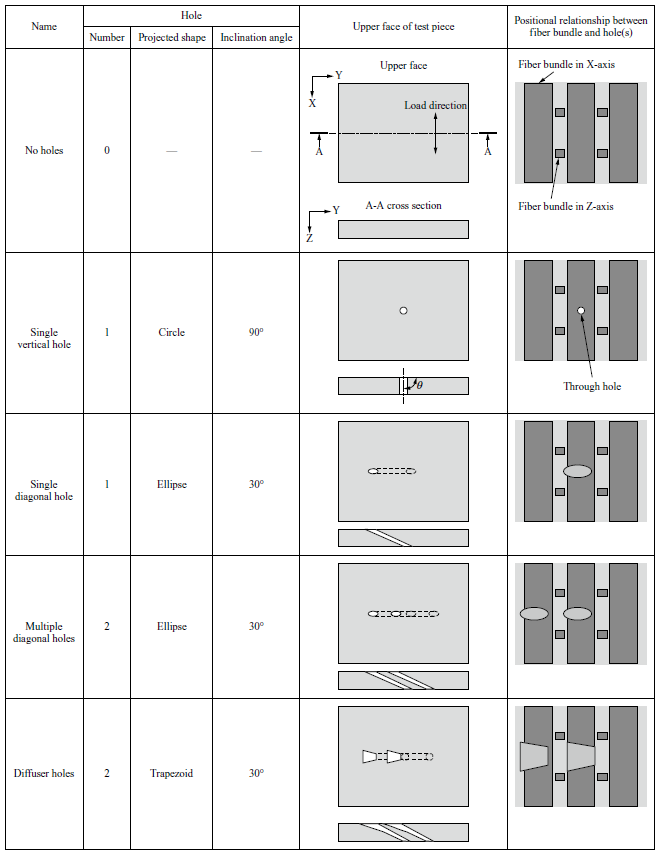
The typical dimensions of a test piece are as shown in Fig. 3. The holes in the test pieces were created using laser processing. Figure 4 schematically illustrates the hole shapes and the positional relationship between the holes and the fiber bundles. In the figure, the hole inclination angles are measured from a test piece’s upper surface, and the load is applied to the y-direction. In this study, one or more holes were positioned at the center of the fiber bundles, considering the significant role of the positional relationship between a hole in a flat plate and the fiber bundle constituting the CMC in the mechanical characteristics of a test piece. Additionally, to confirm the strength reduction resulting from stress concentration in hole sections, a test piece without holes was prepared for comparison. The test piece without holes had a smooth surface in accordance with ASTM C1275-18(5).
2.3 Test conditions
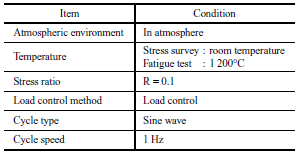
In this study, a stress survey at room temperature was conducted to study deformation of the test pieces and a high temperature fatigue test was also conducted to confirm the fatigue characteristics. Table 1 shows the test condition and Fig. 5 shows the measurement system.
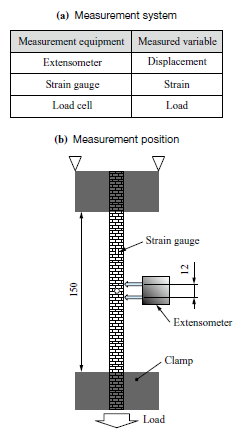
The stress survey was conducted to study the relationship between the load values on the test pieces and the amounts of deformation and strain. To that end, the test pieces were subjected to a small load at room temperature and the amounts of deformation and strain between gauge points on the test pieces were measured using an extensometer and a strain gauge.
The fatigue test was conducted to determine the fatigue life of the perforated test pieces under high temperature conditions. The test was conducted under load control at a target stress ratio of 0.1 in an atmosphere of 1 200°C.
3. Life prediction method
3.1 Stress prediction models
The distribution of stress around hole sections was predicted using finite element analysis (FEA). Assuming that CMC can be modeled as an orthotropic material on a microscopic level, the values obtained through fundamental material tests that we conducted separately were used as input for material models.
The shapes of the analysis models followed the nominal dimensions shown in the design, except for that of the test piece with diffuser holes. The shape of the diffuser holes was reproduced with actual dimensions in the FEA model because dispersion between the dimensions of the manufactured hole and the nominal dimensions was found.
3.2 Life prediction models
To confirm the accuracy of life prediction concerning the perforated test pieces, the strength of these test pieces was compared with that of a test piece without holes. The comparison was conducted by plotting and comparing the log(σ )−log(Nf ) regression line of the test piece without holes and the evaluation stress-fracture cycle relationships of the perforated test pieces under a test load.
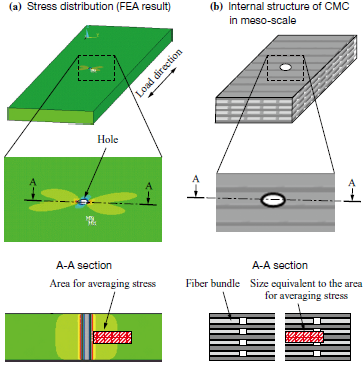
The evaluation stress used in the life prediction of the perforated test pieces was calculated by averaging the stress values obtained through analyzing specific areas of specific cross sections of FEA models. Figure 6 illustrates the relationship between an evaluated cross section and the area utilized for stress averaging in the case of the test piece with a vertical hole. The cross-sectional direction was perpendicular to the load direction. The size of the area utilized for stress averaging was equivalent to the size of the CMC unit cell.
4. Test results
4.1 Stress survey
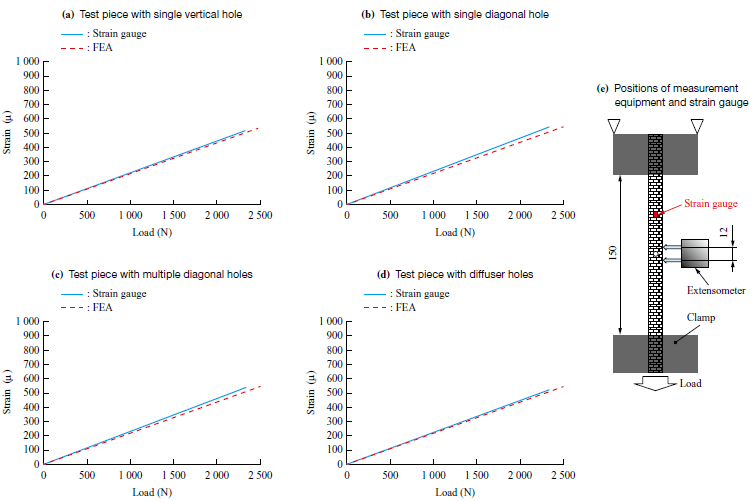
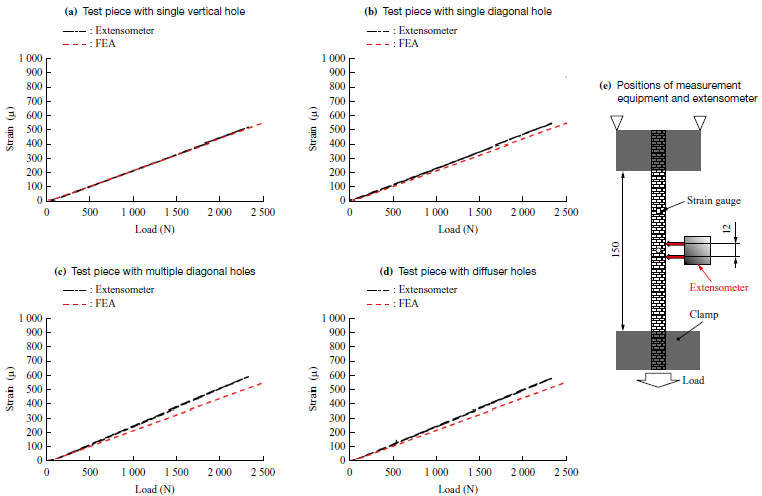
Figure 7 depicts the strain history obtained with a strain gauge and the FEA prediction values for each test piece. The measurement values of the strain gauge positioned at a distance from the hole sections agreed well with prediction values. Figure 8 depicts the strain history measured with an extensometer and the FEA prediction values for each test piece. The measurement values of the extensometer positioned close to the holes of the test pieces with a single hole agreed well with prediction values. In contrast, the measurement values of the extensometer for the test pieces with multiple holes were higher than the prediction values. This was thought to be caused by possible damage occurred during processing in the adjacent holes.
4.2 Fatigue test
Figure 9 shows images of the area around the holes before and after the fatigue test. It was confirmed that each test piece fractured at the center of the hole.
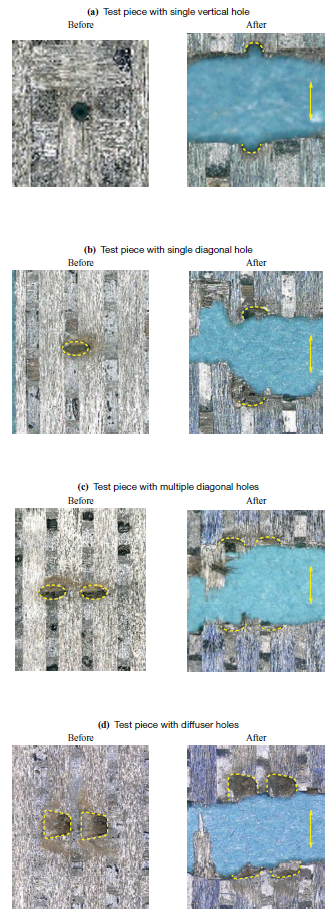
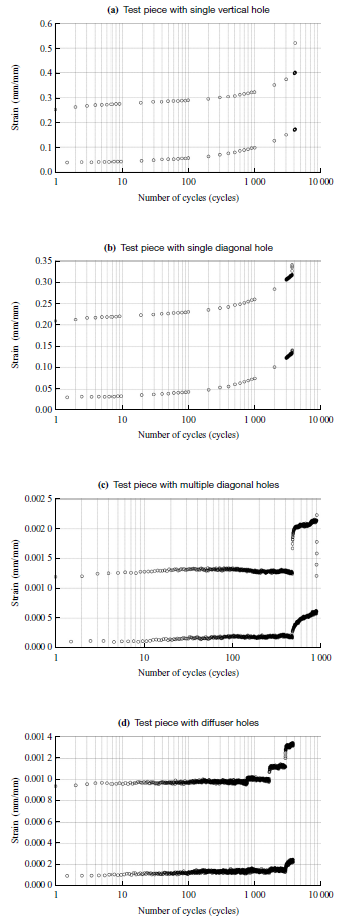
Figure 10 shows the cycle history of strain measured with the extensometer. The maximum and minimum strains under cyclic loads are plotted in the figure. It was confirmed that the strain on the test pieces with a single hole increased monotonously and continuously over time, and then increased suddenly and discontinuously when fractured. In contrast, it was confirmed that the strain on the test pieces with multiple holes increased in a step-like manner over time. Furthermore, by comparing the cycle history of strain and loads, it was confirmed that the loads decreased after the strain increased. Based on this information, it is estimated that the test pieces with multiple holes underwent development of internal damage when the strain increased in a step-like manner. Therefore, in this study, the first discontinuous increase in strain was defined as the initial damage to a hole section and the decline in loads was defined as the final fracture. Additionally, in this study, fatigue life was determined by using the number of cycles when the initial damage occurred.
5. Discussion
Figure 11 illustrates the relationship between evaluation stress and the number of cycles when the initial damage occurred, which were obtained through the fatigue test of the perforated test pieces, overlaid on the S-N chart of the test piece without holes in a 1 200°C environment. The vertical axis in Fig. 11-(a) represents the results using the cross-sectional average stress applied on the minimum cross sections of the test pieces. Also, the vertical axis in Fig. 11-(b) represents the results using the average stress calculated using the method explained in Section 3.2.
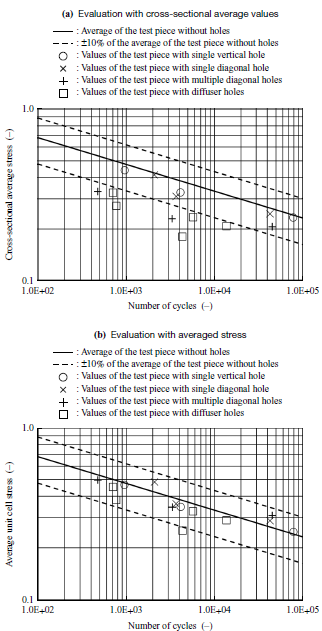
In the case of the evaluation method shown in Fig. 11-(a), the strength of the perforated test pieces is lower than the regression line of the strength of the test piece without holes. In contrast, in the case of the evaluation method shown in Fig. 11-(b), the strength of the perforated test pieces falls within the range of ±10% of the regression line of the strength of the test piece without holes. Within the scope of this study, it was confirmed that evaluating the fatigue life of the perforated test pieces using stress averaged within a unit cell size as a result of FEA enables predicting fatigue life from the test result of the test piece without holes, even when the perforated test pieces have holes of different shapes or in different positions.
However, in the stress survey, verifying the strain distribution around hole sections poses a challenge to be addressed in the future. Analyzing strain using high-resolution images is thought to be an effective approach to addressing this challenge.
6. Conclusion
In this study, test pieces with perforations acting as cooling holes were designed to examine the relationship between hole specifications and fatigue life. This study defined fatigue life as the number of cycles corresponding to the discontinuous increase in strain at the initial stage in the strain history. It was confirmed that using stress averaged in the unit cell size as a result of the FEA enabled prediction of the fatigue life for the four types of perforated test pieces to be predicted from the S-N chart of the test piece without holes.
However, the reason why stress averaged in the unit cell size as a result of FEA enables the fatigue life of multiple types of perforated test pieces to be accurately predicted has not been clarified yet. Thus, it is necessary to understand the mechanism of damage to these test pieces in the future. To achieve this, the effective approach is to observe damage to the hole sections of perforated test pieces during predicted fracture cycles and to identify the fracture mode for each test piece. To observe slight damage around hole sections, using equipment with higher resolution is considered effective.
Also, introducing a homogeneous body capable of expressing the reduction in stiffness of CMC as a damage model is considered to be an effective means of improving the prediction accuracy of strain and stress in analysis models. In contrast, using stress predicted from a homogeneous body model may pose a risk of overestimating the strength of CMC, which has a microstructure comprising a series of fiber bundles and matrices, depending on the actual positions of holes. Considering the absence of fatigue life prediction on the dangerous side, future discussions will need to address the aforementioned risk and the necessity of efforts to evaluate it.
— Acknowledgments —
The achievements presented in this paper have been attained through the En-Core project. We would like to extend our profound gratitude to the individuals involved at JAXA.
REFERENCES
(1) IATA:Our Commitment to Fly Net Zero by 2050,https://www.iata.org/en/programs/environment/flynetzero/,(参照2022. 12. 1)
T. Yamane : En-Core Project (Verification of Core Engine), Verification of Environment Technology, https://www.aero.jaxa.jp/news/event/pdf/sympo211105/sympo02.pdf, accessed 2023-11-15 (in Japanese)
(3) P. H. Wilkins et.al:Effect of a Ceramic Matrix Composite Surface on Film Cooling,Journal of Turbomachinery,( 2022. 3 )
(4) T. Nakamura: Technical Trend of Heat Resistant Non-metallic Material, Journal of Gas Turbine Society of Japan, Vol. 38, No. 3, 2010, pp. 140-145 (in Japanese)
(5) ASTM C1275-18: Standard Test Method for Monotonic Tensile Behavior of Continuous Fiber-Reinforced Advanced Ceramics with Solid Rectangular Cross-Section Test Specimens at Ambient Temperature, 2018
